Installing and running PICPgm on Raspberry Pi
Installation Steps
The following commands download and install PICPgm on your Raspberry Pi:
cd ~
mkdir picpgm_install
cd picpgm_install
wget http://picpgm.picprojects.net/download/picpgm_v2810.tar.gz
tar xzvf picpgm_v2810.tar.gz
sudo ./install.sh
cp pgmifcfg.xml ~
Note: For PICPgm versions till 2.8.1.0, a copy of pgmifcfg.xml has to be in your home directory. For newer versions this will no longer be required. Hence in this case you can omit the last copy command from the installation process.
Running PICPgm on Raspberry Pi
PICPgm on the Raspberry Pi uses the GPIO pins to communicate with the PIC.
The following diagram shows a very simple PIC programmer circuit for the Raspberry Pi.
Since the voltage level on the Rapsberry Pi GPIO pins is 0V or 3.3V, this simple
programmer shall only be used for PIC which work with 3.3V supply voltage.
WARNING: Do not use this circuit for PICs which operate at 5V. If you do that,
it will damage your Raspberry Pi!
If you want to programm 5V PICs with the Raspberry Pi, you need a level shifter between the PIC
and the Pi. I will add a circuit example soon.
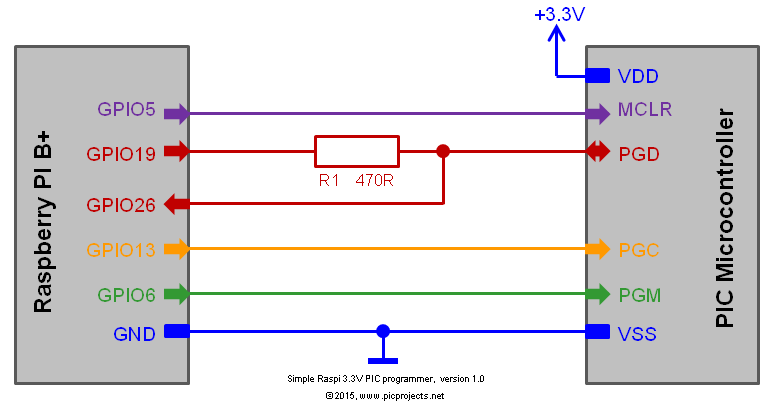
The GPIO pins used in the diagram above are only available on the new Raspberry Pi A+/B+. If you use older Raspberry Pi version or want to use other GPIO pins, you can change the used pins in pgmcfgif.xml which comes along with PICPgm.
The syntax of the configuration filename should be self explaining. The name attibute tells PICPgm the function of the pin and the pin attribute describes the GPIO pin number to be used. So for the above configuration, the programmer configuration looks like that (already preconfigured in delivered PICPgm package):
<PgmIf name="GPIO Programmer (Raspberry Pi)" typ="LVP" connection="GPIO">
    <PinCfg name="MCLR" pin="5" invert="0" />
    <PinCfg name="PGM" pin="6" invert="0" />
    <PinCfg name="CLK" pin="13" invert="0" />
    <PinCfg name="DOUT" pin="19" invert="0" />
    <PinCfg name="DIN" pin="26" invert="0" />
</PgmIf>
Since PICPgm uses memory mapped access to the GPIO pins (required to allow fast GPIO access), you need to run PICPgm with root permissions. I.e. to check whether the programmer circuit is working fine, you could ask PICPgm to check the connection by the following command:
sudo picpgm -r
Now you can program "yourhexfile.hex" with the following command:
sudo picpgm -p yourhexfile.hex